
Jump to: Location map · Waterway study · Architecture · Portraits · Commissioned shoots · Editing and provenance · Official sources
Punggol gives a photographer several places to begin: Waterway bridges, coastal housing, nature paths, retained heritage features and newer district architecture. Choose a subject you enjoy, start with a manageable route and let the conditions of the day shape the photographs. A phone, a little time and a clear idea are enough for a first visit.
Check the exact place before travelling. NParks’ current connector notices say Punggol Point Park has been closed for upgrading since 11 August 2026, with works expected to finish on 31 December 2027. Expected completion is not a confirmed reopening date. The park, Punggol Settlement, wider Promenade and Coney Island have separate identities; check each destination and approach route rather than applying one notice to the entire coast.
NParks publishes 24-hour opening for Punggol Waterway Park and 7am–7pm hours for Coney Island. JTC currently describes the first 400m of the Punggol Heritage Trail as open. These published details help plan a visit; current barriers, route notices and individual venue conditions still matter. The light and composition suggestions below are ideas to try, not promises of weather, crowds or access.
The quick Punggol photo map
| Photo spot | Light to try | What it gives you |
|---|---|---|
| Jewel Bridge | Sunset / blue hour | Waterway, bridge geometry, evening sky |
| Sunrise Bridge | Sunrise | Eastern light across the Waterway |
| Kelong Bridge | Morning / late afternoon | Heritage-inspired bridge form and water |
| Old Punggol Road bus stop | Soft morning / overcast | Old-new Punggol contrast |
| Punggol Coast MRT / PDD | Late afternoon / night | Modern architecture, lines, glass, urban scale |
| Punggol Heritage Trail | Morning / golden hour | Rustic path, retained Old Punggol Road character |
| Shaping Hearts mural / PDD public art | Even daylight | Colour, people-scale architecture, urban art |
| Northshore community spine | Morning / late afternoon | Sheltered perspective lines + seafront district |
| Coney Island | Morning / late afternoon | Boardwalks, forest texture, cycling and nature |
| Punggol Settlement waterfront | Sunset / night | Seafront dining lights and northern horizon |
| One Punggol + Waterway edge | Blue hour | Civic architecture beside water |
1. Jewel Bridge — the classic Punggol sunset frame
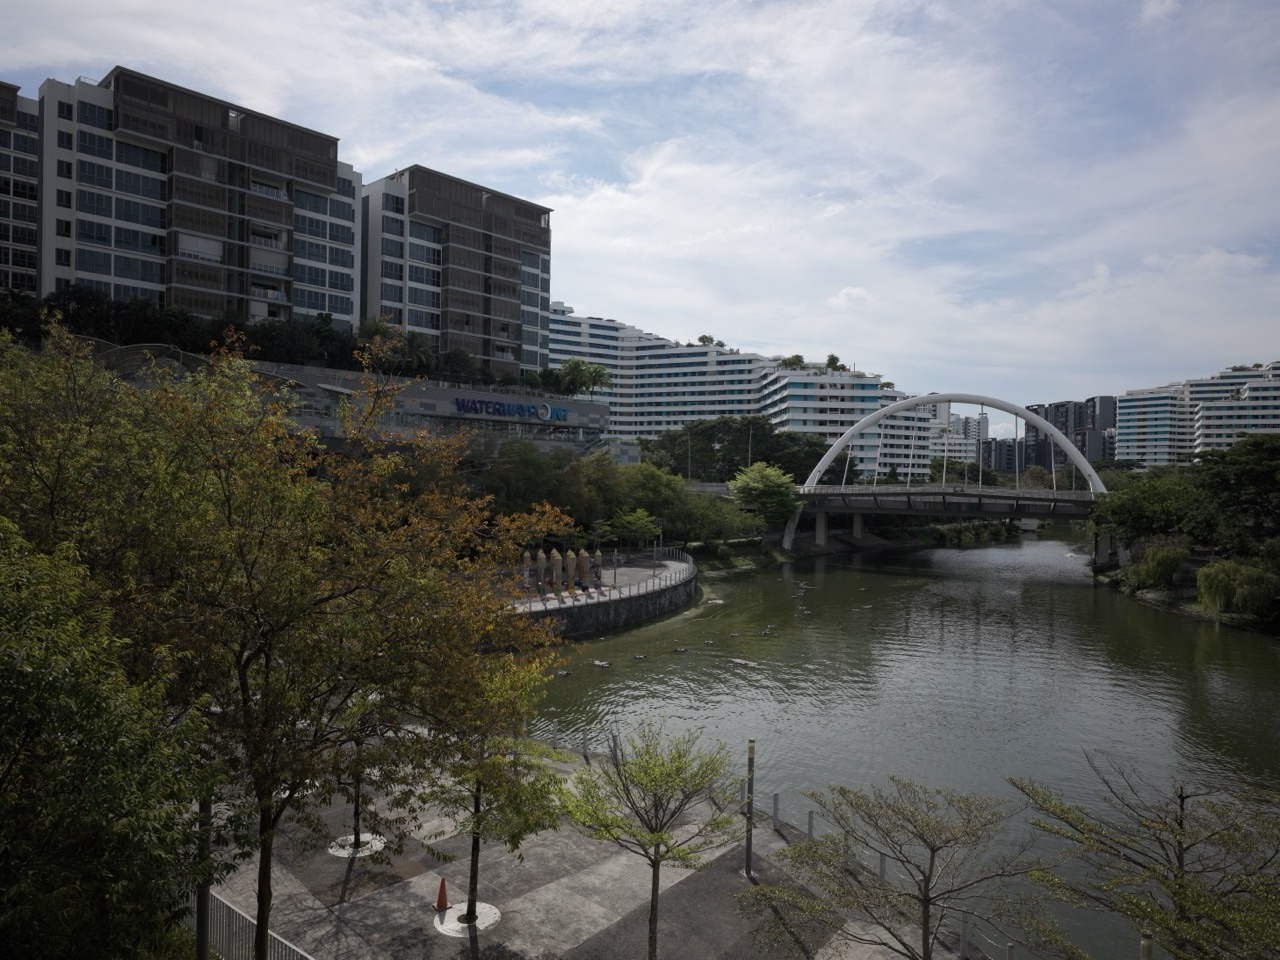
NParks describes Jewel Bridge by its dome-shaped structure and highlights sunset views. The bridge gives a photographer several compositions at once: the bridge itself, its reflection, the Waterway curve, surrounding housing and the evening sky.
- Best for: sunset, couples, silhouettes, city-and-water compositions.
- Lens idea: wide angle for bridge + sky; short telephoto for compressed housing reflections.
- Watch: cyclists and runners use the same paths; do not block the bridge.
2. Sunrise Bridge — an eastern Waterway starting point
NParks places Sunrise Bridge on the eastern side of the park and connects its name with sunrise views. Use that as an orientation clue, then check the sky and the position you can use on your visit. The eastern location does not guarantee a clear sunrise or a particular quality of light.
Arrive before the sun appears rather than at sunrise itself. The pre-dawn blue, bridge lights and first warm colour can be more interesting than the moment the sun clears the skyline.
3. Kelong Bridge — a bridge that tells the older Punggol story
Kelong Bridge was designed to resemble an offshore fishing platform, linking the new Waterway landscape to Punggol’s older fishing-village history. That makes it stronger than a generic bridge portrait: the structure itself contains a local story.
Try photographing the repeating lines and stilts rather than only the full bridge. People moving through the frame give scale.
4. Old Punggol Road bus stop — the old town inside the new one
NParks preserved the old Punggol Road bus stop and a 160m stretch of Old Punggol Road inside the Waterway Park heritage zone. It provides a retained feature to photograph within the modern town’s landscape.
Use a composition that includes both the heritage element and something recognisably modern in the distance if you want the photograph to say “Punggol” rather than simply “old bus stop”.
5. Wave Bridge and the Waterway curves
Try making a bridge’s shape the subject rather than aiming only for a landmark view. At Wave Bridge and surrounding paths, look for curves and lines from accessible positions. A different angle can change the composition without requiring a more distant viewpoint.
A walk along a chosen Waterway stretch can offer bridges, planting and the relationship between housing and water. Plan the distance around your group and the time you want to spend observing. A general walking estimate does not include repeated photography stops; a shorter route may make a better first session.
6. Punggol Coast MRT — new-Punggol architecture
Punggol Coast and Punggol Digital District offer newer architectural subjects around the MRT, district buildings and Campus Boulevard. Choose public viewpoints and check individual venue conditions. A district with public spaces also contains managed areas; do not assume that every campus, office or mall interior is available for your intended shoot.
Use:
- station entrance geometry;
- pedestrian flows;
- reflections from glass facades;
- night lighting;
- SIT and business-tower scale;
- human figures against large architectural forms.
The district works especially well in late afternoon into blue hour, when office, university and public-space lighting begin to overlap.
7. Punggol Heritage Trail — the new place to photograph old Punggol Road
JTC and NParks say the first 400m of the Punggol Heritage Trail is open. The trail retains the undulating character, greenery and features of Old Punggol Road while connecting into Campus Boulevard.
Try showing the retained road character alongside the district’s newer setting. Let the image describe the visible relationship, and use a source for any historical explanation in its caption.
The full planned trail is 1.3km, but do not photograph beyond construction barriers as if the entire planned route is open. JTC’s current community page still describes only the first 400m as open.
8. Shaping Hearts mural and public art in PDD
JTC currently highlights the Shaping Hearts mural as a public attraction in Punggol Digital District. Large public artwork is useful for portraits because the background gives colour without requiring the photographer to manufacture a “Punggol” landmark pose.
Use clean daylight and give the artwork enough space in the frame to remain legible as art rather than becoming an abstract colour wall.
9. Northshore community spine — symmetry and seafront urban design
HDB designed Northshore Plaza I and II around a sheltered two-level community spine that connects Samudera LRT, the plazas, housing and the seafront. That produces strong repeating perspective lines, roof structure, human movement and glimpses of the waterfront.
For architecture photography, photograph the spine when people are present; an empty corridor can look like any mall, while residents walking through show what the design actually does.
10. Northshore waterfront — housing meets the sea
Northshore’s coastal setting offers a different subject from the inland Waterway. Look for the relationship between housing, accessible shared spaces and the sea. What appears on the horizon varies; describe distant objects only as precisely as your observation supports.
Late afternoon is usually easier than midday because the open coast can be harsh in strong sun. Check current access and construction barriers before planning a long waterfront shoot.
11. Coney Island — texture instead of skyline
Coney Island offers a nature setting distinct from the town’s architectural subjects. NParks currently lists the 81-hectare park as open from 7am to 7pm, with boardwalks, cycling paths and diverse habitats.
Photograph:
- boardwalk perspective;
- forest-edge light;
- cyclists moving through the frame;
- coastal plants;
- birds and wildlife from respectful distance;
- rustic path textures.
Do not chase animals off paths for a photograph. Wildlife photography is strongest when the animal’s behaviour remains unchanged by the photographer.
12. Punggol Settlement — check its own access and venue conditions
Punggol Settlement and Punggol Point Park are separate destinations. If you want a dining or waterfront image around the Settlement, check current approach access, the establishment’s opening arrangements and any photography conditions. The park closure does not by itself establish whether every neighbouring route or restaurant is accessible.
Use The Punggol Settlement 2026 for current access.
13. One Punggol + the Waterway edge
One Punggol and the Town Centre make good blue-hour urban photographs because community, transport, retail and water sit close enough to compose together. The best images usually step away from the building and let the Waterway or open public space give the architecture breathing room.
14. Punggol Coast Mall and Campus Boulevard at night
For an evening architecture study, investigate the accessible public spaces around Punggol Coast Mall and Campus Boulevard. Shopfront light, reflections and building forms can provide subjects, but individual venues control their own access. Plan the return journey and choose a position that keeps normal pedestrian movement clear.
JTC describes PDD as a place where business, learning, retail and public life mix rather than a closed business park. Photographing the district after dark makes that mixed-use character visible.
15. Rainy Punggol
Some of Punggol’s strongest photographs happen after rain:
- bridge lights reflected in wet paths;
- mall / MRT reflections;
- misty Waterway scenes;
- umbrellas under the Northshore community spine;
- cloud drama over the coast.
Stop outdoor photography when lightning threatens and follow current official weather advice. An appealing reflection is not a reason to continue a shoot during unsafe conditions. Use the Punggol safety guide for the separate weather and emergency routes; a covered photographic viewpoint should not be assumed to provide appropriate lightning protection.
Starting points by photography style
| Style | Start here |
|---|---|
| Sunrise | Sunrise Bridge |
| Sunset | Jewel Bridge / accessible northern waterfront |
| Architecture | PDD / SIT / Punggol Coast MRT |
| Heritage | Old Punggol Road bus stop / Heritage Trail |
| Nature | Coney Island |
| Seafront HDB | Northshore |
| Street / people | Campus Boulevard / Town Centre |
| Family portrait | Waterway bridges / Northshore common green |
Phone photography: Punggol is very forgiving
- Clean the lens.
- Turn on grid lines.
- Expose for the sky at sunrise/sunset.
- Use 1x first; ultrawide only when the foreground helps.
- Hold still at blue hour rather than relying on digital zoom.
- Use people for scale in PDD and Northshore.
- Take fewer repeated photos and move your position instead.
Portraits: do not make the landmark fight the person
Punggol’s bridges and architecture are large. If you put the subject directly against every landmark, the portrait becomes visually noisy.
Move the person away from the background, use a longer focal length where possible, and let one local element establish the place.
Photography etiquette
- Do not block bridges or shared paths.
- Do not photograph children closely without permission.
- Do not enter construction areas.
- Do not move plants or disturb wildlife.
- Do not use tripods where they create a hazard.
- Follow site rules for commercial shoots, drones and organised filming.
- Keep access clear for strollers and wheelchair users.
Places to avoid or qualify in 2026
Punggol Point Park
NParks lists an upgrading closure from 11 August 2026, with expected works completion on 31 December 2027. Wait for a confirmed reopening and follow the current notice; do not enter the closed park for a photograph.
Unopened sections of Punggol Heritage Trail
JTC currently says the first 400m is open. Follow live signs and barriers rather than the future masterplan.
Construction viewpoints
Punggol Coast/PDD and CRL works are active in parts of the town. Photograph from legal public areas, not worksite entries.
The following routes are examples to adapt, not timed or access-verified itineraries. Check the actual transfer and walking stages. If moving between Punggol Coast and the Waterway would rush the session, choose one area and make the other a separate visit. A sunrise visit also needs a realistic early-arrival and return plan.
A half-day photography route
- Late afternoon: Punggol Coast MRT + PDD architecture.
- Golden hour: open Heritage Trail section.
- Sunset: move to the Waterway / Jewel Bridge.
- Blue hour: Town Centre / One Punggol / Waterway Point reflections.
- Night: finish with food rather than another dark park.
A sunrise route
- Arrive near Sunrise Bridge before first light.
- Photograph the Waterway through sunrise.
- Walk toward Kelong / Heritage Zone.
- Photograph Old Punggol Road elements after the light softens.
- Finish with breakfast in Oasis / Town Centre.
Start with a photograph you want to make
A location list is useful for discovery, but it cannot decide what your photograph should say. Before leaving, choose a subject or a question. You might want a family portrait with a recognisable Punggol setting, a study of bridge shapes, a short account of the town’s changing architecture or a quiet nature image. Those choices lead to different routes, equipment and expectations. You do not need to collect every landmark to make a worthwhile set of photographs.
Try completing this sentence: “I want the viewer to notice…” Perhaps the answer is the curve of the Waterway, the relationship between housing and the coast, or the difference between an old road element and a new district. That sentence gives you something to work toward when the first view is less interesting than expected. It also helps you leave a place with a few purposeful images rather than many near-identical frames that are difficult to select later.
Choose a manageable area for the first outing. One bridge and its approaches can provide more photographic variety than a hurried journey between several distant stops. A family portrait session can work with one accessible background and a comfortable place to pause. For a nature walk, the experience of observing the place may be more important than returning with a particular species. A simple brief lets you adapt without feeling that a changed plan has failed.
Keep the brief separate from factual claims about access. Wanting an open view does not make a closed path available, and wanting a night photograph does not extend a park’s opening hours. Decide what would still satisfy the photographic aim if the preferred position cannot be used. You might change the angle, choose another subject or return another day. A flexible idea is more useful than a fixed image that depends on ignoring a barrier.
Scout the route as well as the camera position
Use a map to identify the general area, then check the route and current notices before treating a viewpoint as part of the plan. In Punggol, a bridge, park, connector and nearby development can have different managers and conditions. The name of the district does not resolve those differences. Write down the actual destination and the route you expect to use, including the way you will return after the photography is finished.
When you arrive, first find a position where you can stand without obstructing anyone. Look around before looking through the screen or viewfinder. A cyclist, runner or person using a mobility aid may need the space you are about to occupy. If the angle requires you to stand in a shared route, find another angle. The photograph should fit the way the place works, rather than asking other visitors to stop using it while you make the image.
Check the return journey while there is still time to change the route. A location that is easy to find in daylight may be less intuitive after an evening session. Consider how much equipment you are carrying, whether someone in the group needs a shorter walk and where you can leave the route if the outing is cut short. These are practical planning questions, not reasons to pack a large emergency kit or turn an ordinary photo walk into an expedition.
Keep a small note of what you actually found: the approach used, the place you stood, any current restriction and whether you would choose the same position again. A saved location pin alone may not show which side of a bridge or which entrance worked. The note becomes useful when you return with a family member or compare images from another visit. It records your experience of a particular route without claiming that the same conditions will remain permanent.
Make a short Waterway study instead of a landmark collection
The Waterway offers an approachable exercise: choose one bridge or one short stretch and make a small set that explains it. Begin with a wider view showing the setting, then find a closer frame of the structure, planting or relationship with the water. You can finish with a detail that drew your attention. This sequence gives a viewer context before asking them to appreciate a shape or texture that might otherwise be hard to place.
At Jewel Bridge, a photograph can emphasise the dome-like form, the sky or the Waterway around it. At Kelong Bridge, the repeating structure can become the subject. At Sunrise Bridge, the eastern setting provides a starting point for a morning visit. Those are different possibilities, not scores in a competition between bridges. Choose the one that suits your idea and current access, then look for a composition that comes from what is visible on the day.
Avoid moving farther along the Waterway simply because you have not yet made a picture you like. First change one thing in the frame. Try a position that places the bridge nearer the edge, includes less sky or gives the foreground a clearer role. If a slight move would interfere with other users, wait or choose a different available position. Learning from a small change is often more useful than walking to another landmark and repeating the same uncertain composition.
For a first visit, finish with a few images that show different aspects of the place rather than a large number of variations. Review them together and ask whether the setting, main subject and detail are genuinely different. If every photograph says the same thing, select the strongest one and plan a different approach next time. The exercise can stay enjoyable and brief while still teaching you how to notice the Waterway more carefully.
Use a phone deliberately before buying more equipment
A phone is enough to begin exploring these locations. Start by cleaning the lens and checking that the frame contains what you intend. A bright waterfront scene can make it easy to overlook a tilted horizon, a distracting object at the edge or a subject that is too small to matter. Take a moment to examine the whole screen before pressing the shutter. That small pause often changes the result more than selecting another automatic effect.
Make one version using your phone’s normal view before trying a wider lens or zoom. Compare what each version adds and removes. A wide view can help describe a bridge and its setting, but it can also make the important subject disappear among unrelated details. A tighter view can make a shape easier to see while losing the context that identifies the place. Choose the framing for the story rather than treating one camera mode as the best option everywhere.
If the phone allows you to select the point of focus and adjust brightness, use those controls intentionally and compare the results. A scene with a bright sky and darker foreground may look different depending on the adjustment. Do not assume that the version with the brightest foreground is automatically better. Look at which details matter to your photograph. Preserve the original image so you can assess the difference without relying on memory.
Keep equipment purchases separate from the first learning task. After a few outings, you may discover a real limitation: perhaps you want a closer view of a distant subject or a different way to work in low light. That is a more useful reason to investigate equipment than buying it because a location list mentions photography. Begin with a camera you already understand, identify the problem from actual images, and then decide whether another tool would help solve it.
Work with changing light without promising a perfect sky
Light suggestions in this guide are starting points. Sunrise, sunset and the period around dusk can produce interesting conditions, but cloud, rain, haze, orientation and the position you can use all affect the image. A recommended time does not guarantee a coloured sky or an unobstructed view. Check the conditions for the date you are visiting and give yourself a subject that still works if the expected light does not appear.
Try separating the scene into the bright areas, the darker areas and the surfaces catching light. A bridge can remain interesting when the sky is plain because the structure creates its own pattern. An overcast visit can be useful for looking at texture and colour without strong highlights. A reflective surface may be worth photographing from a different angle. The aim is to read the available light, rather than judging every outing against a photograph taken under different conditions.
For an evening visit, decide what you want to photograph before darkness changes the route. A wide view of architecture, a lit bridge and a moving person require different choices. Begin with a simple frame and check it carefully. If people or objects appear blurred, decide whether that blur helps describe movement or hides the subject you wanted. A technically sharp photograph and an expressive photograph are related questions, but they are not always the same question.
Do not extend a session merely to wait for a dramatic sky when access, comfort or weather makes leaving the better decision. You can record the scene as it is and return another day. A series of images made in different conditions may eventually describe Punggol more honestly than one idealised view. The landscape includes ordinary mornings and flat skies as well as striking sunsets; all of them can support thoughtful photography.
Photograph architecture through the way the space is used
Punggol Coast and the Digital District offer shapes, surfaces and changes of scale that differ from a Waterway bridge study. Start by looking at the relationship between the main form and its surroundings. You might notice an entrance, a line of columns, a reflection or the meeting of planting and a building edge. Choose one of those relationships before trying to include the whole district in a single photograph.
Use only places that are actually accessible for your intended activity. A district with public spaces also contains areas serving businesses, students, residents and building operations. A visible corridor or upper level is not automatically a viewpoint you may enter. Follow signs and the relevant owner’s instructions. If a photograph requires a position inside a managed building, ask about access and photography conditions instead of assuming that an open door gives permission for the planned shoot.
Human scale can help a viewer understand architecture, but people are not props supplied by a location. For a portrait, work with a willing subject. For a broader scene, frame it respectfully and avoid making an identifiable stranger the focus of an image intended for promotion without resolving the relevant consent and use questions. This is an editorial recommendation for considerate practice, not a claim that one rule covers every possible photograph or publication.
Review whether the image shows how the space connects. A striking close-up may communicate a shape while saying little about the district. A wider frame might explain a pedestrian route or the relationship between buildings. Both can be useful if you label them honestly. The current Digital District guide provides the separate reading route for what is open and what is planned; your image should not silently turn a future component into a present-day scene.
Read Northshore through lines, levels and the coastal setting
Northshore can support a study of how a neighbourhood connects. The community spine, plaza spaces, housing and waterfront give you several scales to observe. Choose an accessible position and look at how one space leads toward another. A photograph of a repeating roof structure answers a different visual question from an image showing housing beside the coast. Decide which relationship matters before filling the frame with every available element.
Look at the edges of the image as carefully as the centre. A line leading into a scene may guide the viewer toward the subject, or it may direct attention out of the frame. A vertical element at the edge can help organise the composition, but an accidental partial object can compete with the main idea. Try a small change in position where you can do so without obstructing the route, and compare the two images rather than relying on a vague impression.
The waterfront introduces another scale: people, buildings, the horizon and distant movement. Keep the horizon deliberate and avoid describing a distant object more precisely than your image or observation supports. A vessel on the horizon does not establish its identity, destination or activity. You can still make a clear caption that describes the coastal setting and the foreground. Photography can invite further questions without supplying an invented answer to every visible detail.
Do not use residential privacy as the price of a more interesting angle. Avoid directing a close view into someone’s home or treating a private facility as part of the public photography route. Choose a composition that works from an appropriate shared space. Northshore’s value as a subject lies partly in the relationship between everyday housing and the wider landscape. You can show that relationship while keeping the residents’ own spaces out of the frame.
Let heritage photographs raise a question before making a claim
The retained Old Punggol Road bus stop and the Heritage Trail can encourage a useful old-and-new comparison. A photograph may show a surviving feature beside a modern setting, but the image alone does not explain the full history of either. Begin with a description of what is visible. Then use a reliable source for the historical statement you want to add. Keep the observation and the sourced explanation distinct so the caption does not claim more than the evidence supports.
For example, you can describe the retained bus stop as a visible feature of the Waterway heritage area, then attribute the preservation information to NParks. Avoid assigning a precise age to every surrounding object merely because it looks old. A weathered surface, a recreated structure and a preserved element are different things. If you do not know which applies, write a modest description and investigate the question before making it the main claim of a history caption.
At the Heritage Trail, check which section is open and use only that section for the route. JTC’s current community page distinguishes the open portion from the full planned trail. A photograph taken along an available section should not be captioned as proof that the entire planned connection is complete. This distinction matters when images are reused in guides, social posts or school projects, where a short caption can easily lose the qualification contained in a longer article.
Create a small evidence note for any historical image you intend to publish: where it was taken, when it was taken, what the camera shows and which source supports the history. The Wak Sumang and Kampung Punggol guide explains why maps, memories and later interpretations need to remain distinct. A careful photograph can become a useful record when its caption keeps those same distinctions visible.
Observe nature without arranging it for the camera
Coney Island and the planted Waterway landscape offer another way to practise attention. Begin with a subject that does not depend on an animal appearing: a texture, a pattern of vegetation, a view along an available path or a change between open and shaded space. This makes the outing worthwhile even when wildlife is absent. It also reduces the temptation to follow an animal or leave the route simply because a particular photograph was expected.
Stay on the appropriate routes and let encounters happen at a respectful distance. Do not move vegetation, offer food or try to make wildlife turn toward the lens. Follow the current park guidance and any instructions on site. The linked Punggol wildlife guide provides the separate encounter advice. A photo walk is not an exception to that guidance, and a camera does not create a reason to approach more closely.
Describe a subject at the level you can support. If you cannot identify a bird or plant confidently, use a broader label or seek a reliable identification before publishing a species name. A blurry distant image may still record an interesting moment, but it may not contain enough detail to establish an exact identification. Separate what you saw from what you think it might have been. That habit is valuable for both a casual album and a student observation project.
Choose a return time that fits the park’s operating conditions. Coney Island is not a night-photography extension of the Waterway. The published hours and current access notices belong in the plan before the camera comes out. You may decide to finish the nature visit earlier and make an evening image elsewhere. That gives each place its own role and avoids treating all of northern Punggol as one continuous, always-available photographic backdrop.
Make portraits comfortable for the people in them
A family portrait begins with the people, not with the landmark. Ask what kind of image they would enjoy and how much walking or waiting is reasonable. A child may prefer a brief session; an older relative may need a seat or a nearby arrival point. Choose a background that fits those needs. The bridge or building should help establish the setting without making the group work harder than necessary to include it.
Keep the instructions simple. Show the person where you would like them to stand and explain what you are trying to include. Avoid asking someone to step backward while you remain focused on the screen; both of you need to know what is behind them. Choose a position with adequate space, and move the camera or change the composition if the available position does not work. There is no need to stand at an edge or obstruct a route to make the landmark visible.
Give the subject a chance to see the result and decide what they are comfortable keeping or sharing. Permission to take a family photograph and agreement about where it will appear are separate conversations. This matters particularly when an image might later be used for a business page, promotional post or public article. Make the intended use clear rather than relying on a casual pose as evidence that every future use has been accepted.
For children, keep the session proportionate and let a responsible adult manage supervision. Stop when the activity becomes tiring or uncomfortable instead of trying to complete a large shot list. A few relaxed photographs can preserve the occasion better than many forced versions. When reviewing the set, consider the person’s expression, comfort and dignity alongside the visual composition. A technically appealing background does not make an unkind or unwanted portrait a good choice to publish.
Treat a commissioned shoot as a different planning job
A commissioned portrait, branded image or organised filming session needs more preparation than an informal photo walk. NParks’ current on-location filming permit page says filming and commercial photography in its parks and nature reserves require a permit and asks applicants to submit at least one month before the proposed photography or filming dates. Check the current application and exact site conditions for your project rather than relying on an older summary. Do not extend NParks’ process into a claim that every building, plaza or privately managed location uses the same permission system.
Identify who manages each proposed location. A shoot that moves between a park, station environment, mall and campus can cross several sets of access conditions. Ask about the intended use, equipment, participants and timing with the appropriate owner. Keep any replies and confirmed approvals with the shoot plan. An organiser should be able to distinguish an attractive idea on a mood board from a location that has actually been cleared for the planned session.
Agree with the photographer or organiser who handles these enquiries and what happens if a location becomes unavailable. A useful plan states the meeting point, permitted working area, expected duration and a realistic alternative. It also separates permissions from the delivery agreement for the images. The guide does not set contract terms or promise approval; it helps you identify questions that should be answered before participants arrive with outfits, equipment or a commercial brief.
Be clear about the images that will be delivered and how they will be used. Ask about editing, selection, publication and any restrictions in the actual agreement. If artwork, recognisable people or a managed venue will be prominent, resolve the relevant use questions rather than assuming the location owner’s access permission answers all of them. A well-organised shoot can feel relaxed on the day because its practical and publication decisions were made in advance.
Keep drone photography outside the casual location list
An appealing aerial image does not tell you whether you may fly a drone at that location today. Treat drone use as a separate planning task. The Civil Aviation Authority of Singapore’s unmanned-aircraft guidance links to operating requirements, no-fly zones, temporary restrictions, registration, remote identification and permit information. Check the current requirements for the aircraft, purpose and exact location before proposing a flight. A ground-level photo guide cannot clear that operation.
Do not copy another person’s flight as proof of permission. Their equipment, purpose, approvals and date may differ from yours, and the image may not show where they launched. Likewise, a park or plaza that is accessible on foot does not automatically provide an authorised launch area. The responsible aviation guidance and the conditions of the land or venue both need attention. If you cannot establish the relevant position, choose a ground-level photograph instead.
Keep the brief realistic when speaking to a drone operator. Explain the intended subject and use, ask what can lawfully and practically be done, and leave room for a different image if the proposed view is unavailable. Avoid promising a client or group a particular flight before those checks have been completed. This guide deliberately gives no weight threshold, altitude shortcut or district-wide clearance claim; the current official requirements are the appropriate place for those decisions.
Ground-level photography still offers plenty of ways to show scale: a wider view, an accessible change of position, repeating architectural forms or the relationship between a person and the setting. You do not need an aerial image to make Punggol legible. If the project genuinely requires one, plan it through the proper specialist route rather than adding a drone to an ordinary outing and discovering the unresolved questions after arriving.
Edit the image without losing the record of what happened
Editing can help a photograph communicate more clearly. A crop may remove a distraction, a brightness adjustment may reveal the intended subject, and a colour change may support a personal visual style. Keep an original version and make the edited copy separately. That gives you a way to compare decisions and recover information if a later crop is too tight. It also helps distinguish the camera’s record from the version selected for sharing.
Think about the purpose before making a substantial alteration. A personal art image and a factual location record have different expectations. If you remove a barrier from an image used to explain access, the result can mislead someone planning a visit. If you replace a sky, add a person or extend the scene, the image may become an illustration rather than a straightforward record of the visit. Make that distinction visible wherever it affects how the image will be understood.
Do not label generated imagery as a photograph taken at Punggol. If an image is created or substantially altered using generative tools, describe that provenance accurately when publishing it as part of a guide, report or learning project. An attractive visual cannot establish that a place is open, that an event happened or that a particular scene was observed. Use real current evidence for those claims and keep illustrative material clearly separate.
For a factual photo set, write the caption while the visit is still fresh. Record the date, location and any important limitation, such as a partial route or a temporary barrier outside the frame. Avoid turning a selectively framed picture into a broad condition report. A carefully edited photograph can still be honest; the key is that the image and caption together do not imply something the visit, original record or reliable sources cannot support.
Build a small student photo essay with observations and sources
A Punggol photo walk can become a useful learning task without turning the outing into a worksheet marathon. Choose one question, such as how a bridge connects two sides of the Waterway or how a district’s pedestrian spaces relate to nearby buildings. Make a small set that helps answer it: a contextual view, a closer observation and a detail. The student should be able to explain why each image is included rather than presenting a folder of unrelated landmarks.
Separate three parts in the notes: what is visible, what a source says and what the student thinks it means. For example, an image may show a covered route; an official design document may explain its intended connection; the student may infer how it helps people travel. Those are related statements, but the photograph does not prove all of them by itself. Keeping the parts distinct makes the explanation clearer and gives the student a way to revise an inference.
Give the captions a clear structure. Name the place, state the observation and add a sourced explanation only where it is needed. Do not use a grand claim about the whole town when the image shows one small feature. If the student cannot support a particular detail, change the wording or investigate further. This is practical work in clear English: the words should tell the reader what matters in the picture and which parts remain uncertain.
Finish with a short comparison rather than a ranking. What does a bridge study show that an architecture study does not? How does a retained heritage element differ from a newly designed public space? Which question would the student investigate on another visit? The activity can connect observation, explanation and local history while preserving the pleasure of being outdoors. A thoughtful small essay is more useful than a long sequence that repeats the same sentence beneath every image.
Select, caption and store the photographs you will use
Selection is part of photography, not merely a final administrative task. Begin by removing images that fail the purpose of the set, then compare the remaining versions. Look for differences in subject, framing and meaning rather than keeping every small variation. If you are making a short account of a place, a clear opening image, a closer study and a detail may be enough. A smaller set can help the viewer understand the sequence.
Check captions against both the photograph and your notes. Make sure the location is correct and that the date describes the actual visit. Distinguish a photograph of an accessible section from a claim about the entire route. If you share an older image, retain its older date instead of giving it the date of publication and leaving the reader to assume it was taken recently. Current access information should come from a separate checked source.
Use a filename and folder arrangement that helps you find the original later. You might organise by visit date and area, with a short description of the subject. Keep originals, selected copies and significantly altered illustrations distinguishable. This is a practical suggestion rather than a technical requirement. The useful result is that someone preparing a later article or project can identify the source image and understand which version was used.
Finally, review the set as a reader would encounter it. Does it show the intended place clearly? Are any people uncomfortable with the planned use? Could an edit or caption imply access that was not verified? Are illustrations identified honestly? Once those questions are resolved, share the images in a way that fits their purpose. Punggol’s bridges, coast, heritage traces and newer architecture provide many subjects; careful selection and truthful context are what turn them into a useful record.
Current official access sources
- NParks — Punggol Waterway Park
- NParks — Coney Island Park
- JTC — Punggol Digital District community spaces
- HDB — Punggol / Northshore Plaza
- NParks — current connector notices
- NParks — photography and commercial permit guidance
- CAAS — unmanned aircraft guidance
Updated and expanded: 2 October 2026. Current NParks park and connector information, JTC’s district community information, NParks’ commercial-photography guidance and CAAS’ unmanned-aircraft entry guidance informed this update. Suggested viewpoints and light choices are planning ideas. Check the responsible owner’s current conditions before a special shoot, and keep captions clear about when and where an image was made.
Continue exploring Punggol
- One Day in Punggol
- Punggol Waterway Park Guide
- Punggol Digital District Guide
- The Complete Punggol Guide
The best Punggol photograph is usually a contrast: old road and new district, HDB and water, forest and skyline, commuter and architecture. The town is visually interesting because several versions of Punggol are now visible at the same time.
Punggol nature web: Coney Island · Waterway Park · Punggol Point / Closure · Lorong Halus · Punggol Promenade · Sunrise & Sunset · Birds & Wildlife · Picnic & BBQ · Accessible Routes · Punggol & Serangoon Reservoirs · Complete Punggol Guide.
Estate routing: Return to the eduKatePunggol Atlas for the full learning, family and town knowledge graph, or continue through the neighbourhood and local-life routes above.


