
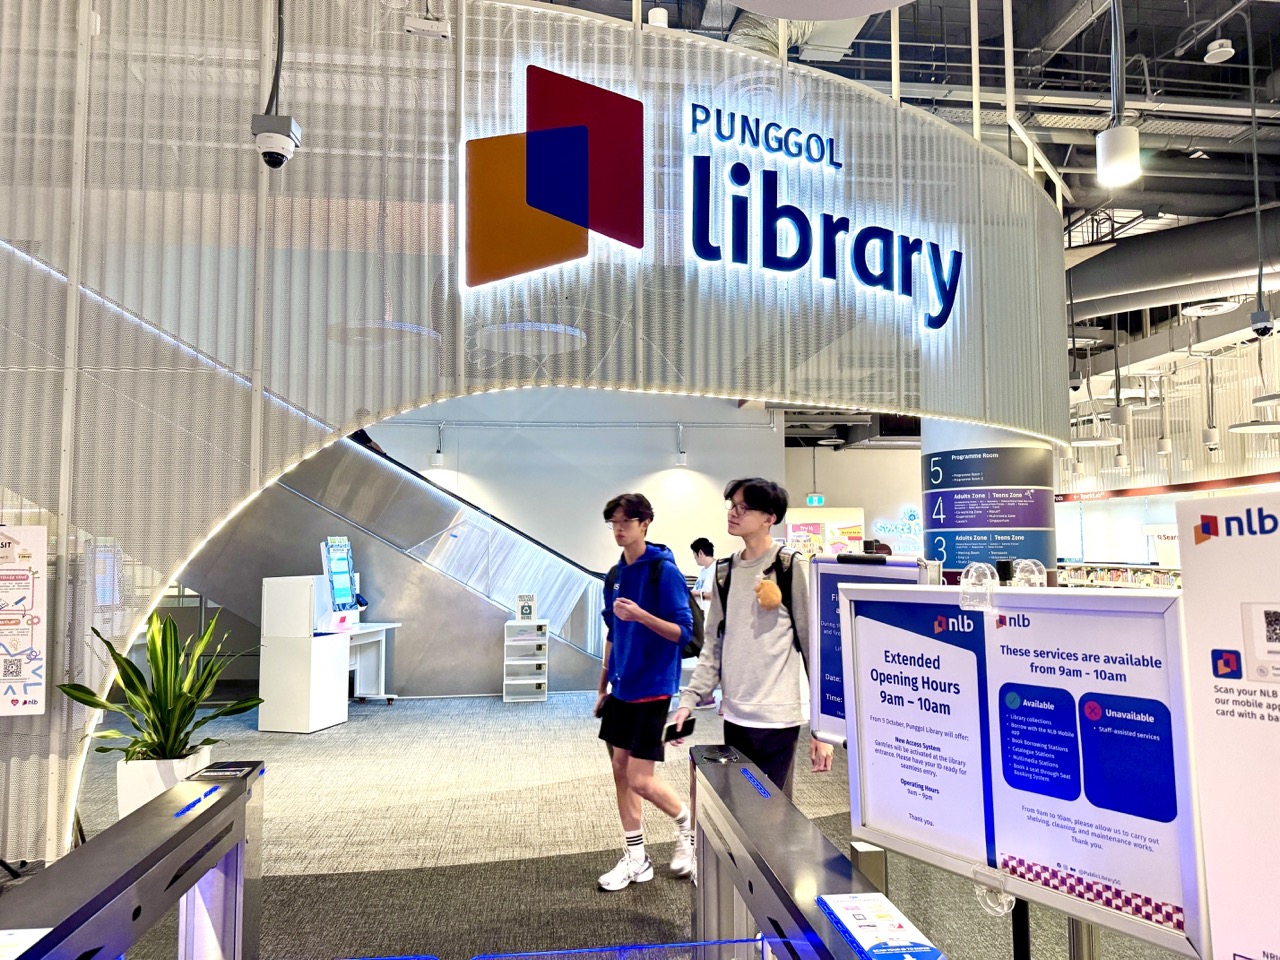
The top 10 things to do in Punggol for makers and DIY hobbyists are to learn 3D printing, experiment with a 3D pen, sew a practical repair, try an approved robotics-and-coding session, explore digital cutting, upcycle a household organiser, build a paper bridge from Waterway Park inspiration, create a miniature heritage exhibit, test an awning model inspired by Punggol Digital District and produce a mini-zine that explains the design decisions.
Best first choice: NLB’s MakeIT at Punggol Regional Library, Level 4 of One Punggol. NLB lists 3D printers, 3D pens and sewing machines as bookable MakeIT Yourself equipment in Punggol; other makerspace technologies may require a Starter Session, certification and an appropriate booking. A programme description does not establish a walk-in place on the day you want.
For families who prefer not to make a machine booking, start with a clean cardboard model, a small safe repair or a desk-based geometry test. This guide is arranged around a useful maker discipline: choose a real problem, build the smallest reasonable prototype, test it, diagnose what went wrong and change one thing.
Choose your first maker experience in Punggol
- First time in a makerspace: look for NLB’s official beginner or Starter Session, with age and registration checked.
- Have an eligible approved equipment booking: work on one modest 3D print, 3D pen shape or sewing exercise.
- Interested in software and logic: enrol in a real robotics-and-coding session rather than assuming a robot kit is always available.
- Want to save money: practise a cardboard organiser or paper model at home using clean materials you already own.
- Interested in local architecture: observe Waterway Park bridges or public Digital District shading features, then model one idea safely at home.
- Want a school or personal portfolio: record one failed attempt and one measured improvement in an original mini-zine.
What the Clementi-style learning method means for makers
The first visible result of a maker project is not necessarily the real result. A cable clip that looks attractive but cannot fit a cable has not solved its problem. A cardboard bridge that holds a counter once may not be a fair comparison if its supports were altered. The deeper learning happens when someone identifies the mechanism and the first incorrect assumption. That is why each activity below includes the reason, the steps, a worked example, an error diagnosis and a boundary on the conclusion.
Begin with language that makes the job testable: ‘This pouch must hold two pens’ is more useful than ‘Make something creative’. Decide what you will observe before building. If the goal involves a size, write the unit and measure the object. If it involves stability, decide what counts as bending or tipping. If it involves communication, ask whether someone else can follow your instructions. A maker who can explain the test is less likely to mistake novelty for usefulness.
The second principle is safety and permission. Punggol’s library makerspace is a shared public service with equipment conditions; public park bridges are infrastructure, not playground testing rigs; Punggol Digital District has public amenities and restricted working areas. A good maker reads the relevant rules before trying a tool. Responsible constraints can lead to more creative, safer designs.
Ten maker activities with exact practical exercises
1. Book the right NLB MakeIT 3D printing experience
Where: MakeIT at Punggol Regional Library, Level 4, One Punggol.
Why this skill matters
NLB identifies 3D printing as a signature MakeIT learning area and lists printers among its bookable MakeIT Yourself equipment in Punggol. A maker learns that a model on a computer is only an instruction for a physical process. It must have dimensions, a suitable footprint and a purpose. The important first task is deciding whether a Starter Session, certification or an eligible self-service booking is appropriate, rather than assuming an available machine simply because the library is open.
Practical steps
Choose a harmless object with a measurable job, such as a cable label that does not alter any electrical component. Sketch the length and width of the cable and the amount of clearance a label needs. Design a plain shape first; avoid decorative features that conceal its function. Consult the current NLB machine-use guidance and reserve the appropriate experience. If the booking is unavailable, keep the 3D file and test dimensions in cardboard rather than demanding an immediate print.
Worked local example
A Secondary student designs a label holder for two similar charging cables. The first design fits on screen but the opening is too narrow for the real sleeve. The student records the mismatch in millimetres, widens one dimension and tests the next version. They do not need a perfect showpiece: the documented correction demonstrates that measurement and real-world fit matter more than a screenshot.
Diagnose and repair
If the print does not fit, ask whether the model was measured incorrectly, the material behaved differently from expected or the intended object changed. Do not revise the entire design at once. If one side is weak, identify the location and intended force before increasing its thickness. Compare the first and second versions using the same test object. A clear record should include the purpose, relevant dimensions, test result and next small change.
Transfer the skill
The same first-principles habits transfer to mathematics, product design and workplace prototyping. A designer must specify what should happen, model how it might happen, observe the outcome and recognise what the test cannot prove. Beginners also learn to save versions consistently so that the corrected file does not overwrite the evidence of the earlier mistake. This matters even if their project ends as a sketch instead of a printed object.
Safety and evidence boundary
Printers involve moving hot components and material restrictions. NLB’s published self-service booking uses Singpass verification and may require eligible certification depending on equipment category. Follow current venue rules and staff instructions. Do not make weapons, hazardous parts, unauthorised copyrighted designs or safety-critical electrical accessories. A booked machine is not a commercial manufacturing service with unlimited time or consumables.
Primary source: Book the right NLB MakeIT 3D printing experience. Verify live programme dates, eligibility and venue access.
2. Use a 3D pen to understand shape, support and patience
Where: MakeIT Yourself, Punggol Library, subject to an approved 3D-pen slot.
Why this skill matters
NLB’s self-service equipment list for Punggol includes 3D pens. This is a useful first encounter with digital-making materials because it links a hand movement with a three-dimensional object. A pen does not guarantee a successful sculpture. Beginners must discover how a stable base, supported joint and suitable pace affect the resulting shape. Starting on a flat surface makes those variables easier to observe than attempting to draw a tall form in the air.
Practical steps
Choose a geometric outline, perhaps a triangle or a small six-sided frame. Draw the shape on paper and ask about approved protective surfaces. During an appropriate booked session, follow instructions for material choice, heating and safe handling. Begin with an outline, then add supported connections. Make a second version only after inspecting where the first bent. Younger learners can plan or observe while trained staff and responsible adults manage equipment according to the current rules.
Worked local example
A family plans a small frame and discovers that its first joint sags after being lifted. They sketch where the deformation occurred and produce a new version with a simpler connection and shorter unsupported span. The revised frame is less ornate but holds its intended shape. They do not claim that the material would perform identically under heat, heavy loads or repeated stress; those conditions were never tested.
Diagnose and repair
When a shape bends, isolate whether the failure started at a joint or along a long unsupported length. Moving too quickly, touching material before it cools or adding excess material can introduce new problems. Keep a test card showing the outline, connection and visible result. If a simpler flat object is stronger, that is a useful outcome. The lesson is not to persist with a fragile structure merely because it looks ambitious.
Transfer the skill
A 3D pen exercise teaches sequencing and spatial reasoning. Students can predict which sides of a polygon create rigidity, compare symmetrical and irregular forms, and describe a design using clear geometry vocabulary. The activity can also lead to stronger drawing skills because the maker must imagine the finished shape before moving the tool. It is a good example of how engineering ideas emerge from very small creative decisions.
Safety and evidence boundary
The nozzle and extruded material may be hot. Do not permit unsupervised young children to operate the pen, touch fresh material or reach into equipment. Actual age limits, certification, duration and consumables depend on NLB’s current terms. A web listing of 3D pens is not proof that a same-day slot is free; obtain confirmation before travelling specifically for this experience.
Primary source: Use a 3D pen to understand shape, support and patience. Verify live programme dates, eligibility and venue access.
3. Sew a small fabric pouch or make a safe repair
Where: Bookable Punggol Library MakeIT sewing equipment or a suitable home workspace.
Why this skill matters
NLB lists sewing machines among the MakeIT Yourself equipment at Punggol Library. Sewing can make a practical difference because a neat seam may extend the useful life of an item instead of creating yet another object. The craft combines fine motor coordination, measurement, material choice and patience. For a first project, a straight seam or a basic pouch offers clearer feedback than an elaborate garment with many curved seams and fitting requirements.
Practical steps
Use clean scrap fabric or a harmless item needing a cosmetic repair. Learn which side of the fabric faces outward, where a seam allowance is measured and how the material should be guided under the machine. With proper venue authorisation, practise on a test strip before beginning the actual pouch. Mark a simple sewing line, move slowly and use the operator’s instructions to finish and secure the stitches. At home, follow the machine manual.
Worked local example
A student repairs the loose lining of a non-safety-critical stationery pouch. The first sample seam wrinkles because the material is being pulled unevenly. The student changes how the fabric is supported, tests on another scrap and then completes the actual repair when competent to do so. The finished pouch stores pencils without a new purchase; the learner also knows exactly which change fixed the first problem.
Diagnose and repair
If stitches are uneven, check whether the machine is threaded correctly, whether the fabric is suitable, whether the speed is manageable and whether the seam allowance was marked accurately. Do not immediately attribute the problem to poor effort. A trained instructor may need to assess tension or equipment settings. Use a gently applied practical load only if the material and repair are suitable for that test.
Transfer the skill
Sewing strengthens the habit of matching tools to materials. It teaches that neatness is a consequence of control and preparation, not merely decorative talent. The same process appears when students review working in Mathematics or edit a writing draft: identify the precise place where an error begins and correct it without tearing apart everything else. A mended pouch can become a small but useful portfolio example.
Safety and evidence boundary
Moving needles and electrical machines can cause injuries. Follow NLB’s booking, age and safety instructions. Never attempt improvised fixes to infant harnesses, seat belts, climbing gear or other load-bearing safety products. Choose simple non-critical fabric projects, and ask a qualified repairer to inspect items whose failure could harm someone. Machine access must be confirmed, not assumed.
Primary source: Sew a small fabric pouch or make a safe repair. Verify live programme dates, eligibility and venue access.
4. Explore basic robotics and coding in an approved starter session
Where: MakeIT at Punggol Regional Library, when the relevant session is scheduled.
Why this skill matters
NLB describes robotics and coding as a MakeIT learning area, using robotic kits and microcontrollers to introduce programming. This does not establish that a robot is available to every walk-in visitor. The value for a beginner is the ability to express a sequence of actions precisely. A robot cannot infer that a learner meant to turn left if the instructions specify right. Observation and debugging turn that apparent limitation into a powerful learning tool.
Practical steps
Read the current workshop requirements and register if eligible. Before touching a kit, write five instructions for a small hypothetical robot: start, move, pause, turn and stop. Draw the intended route on paper. During a confirmed session, compare the route with the robot’s actual movement. Ask which individual command caused the first discrepancy and change only that command. If the session is fully booked, model the same process using paper arrows.
Worked local example
A learner plans a robot route around two markers. The first sequence approaches the second marker at the wrong angle. Instead of rerunning it repeatedly without reflection, the learner identifies the incorrect turn, adjusts its duration or direction as the kit allows and reruns the same route. They keep a before-and-after table so the new command can be connected to the observed improvement.
Diagnose and repair
A failed robot test can come from unclear commands, missing instructions, environmental conditions or equipment problems. Distinguish these causes before rewriting code. Ask whether a command was actually executed and whether the start position matched the plan. Avoid changing both the route and timing in one test. When an unexpected result repeats, document it for the instructor instead of opening a motor enclosure or bypassing safety instructions.
Transfer the skill
Coding sequences help students see why algorithms need conditions, ordering and unambiguous language. They also illustrate the difference between model, test and correction. A young learner can apply this to reading multi-step instructions, writing procedural English or solving a sequence problem in Mathematics. The learning outcome is the explanation of a decision, not possession of a commercial robot.
Safety and evidence boundary
Follow the organiser’s age, registration and supervision terms. A makerspace’s listed learning area does not guarantee a free kit, a scheduled Punggol event or unrestricted access to tools. Do not tamper with batteries, chargers or moving motors. Staff and venue rules override a maker’s preferred experiment, especially when children are using shared equipment.
Primary source: Explore basic robotics and coding in an approved starter session. Verify live programme dates, eligibility and venue access.
5. Design a digitally cut paper silhouette inspired by Punggol’s bridges
Where: An approved MakeIT digital-cutting learning session, with a safe public waterway observation.
Why this skill matters
NLB lists digital cutting as a signature MakeIT area, and NParks documents named bridges at Punggol Waterway Park. Combining the two gives a maker a local design problem: how can a recognisable bridge profile be simplified into a stable paper outline? Cutting requires the design to respect material thickness, minimum gaps and what each line represents. A beautiful screen image with extremely thin segments may fail as a physical object.
Practical steps
Make a simple sketch from a lawful park viewpoint. Reduce it to a small number of shapes using a pen and ruler; do not claim exact structural measurements. Create two paper mock-ups manually before seeking a machine session. If a suitable MakeIT programme is offered, check whether the cutting technology, material and file type are permitted. Test a small sample shape first, then revise the details that tear or cannot be separated cleanly.
Worked local example
A maker draws a Wave Bridge-inspired arch and decorative railing. The first cut-out has delicate strips that rip during handling. Rather than forcing the machine to make the same design repeatedly, the maker thickens two weak areas and removes a minor detail. The second paper object communicates the bridge more clearly and survives gentle handling. The record explains why simplification improved manufacturing.
Diagnose and repair
When a cut fails, check whether the problem lies in the drawing, material, tool settings or handling after cutting. Differentiate a line intended for cutting from a fold or decorative mark. Observe whether the failure happens during the machine step or when removing the object. Compare two versions on the same kind of sheet. If ordinary scissors would be safer and sufficient, that is a valid design choice.
Transfer the skill
The project links local observation with geometry, visual communication and production constraints. A student can explain how negative space affects a silhouette, how repeated arches create rhythm and why structural-looking supports need enough material in a paper model. The exercise is about artistic abstraction and material behaviour, not a professional structural appraisal of the actual waterway bridge.
Safety and evidence boundary
Powered cutting machines and some laser systems are hazardous when used without training. Never operate them without venue authorisation or use materials not approved for that machine. Do not climb a public bridge, block a path or enter the water to obtain a sketch. NLB’s technology list is not a real-time confirmation of Punggol equipment availability.
Primary source: Design a digitally cut paper silhouette inspired by Punggol’s bridges. Verify live programme dates, eligibility and venue access.
6. Upcycle a clean box into a useful home organiser
Where: A family home in Punggol, using materials already safely available.
Why this skill matters
NEA recommends reducing purchases and reusing items where suitable. This makes home upcycling a real maker activity rather than merely a craft trend. The purpose is to solve a household problem with an existing item, not to buy an elaborate set of new supplies and then call the result zero-waste. A clean sturdy box can help sort stationery, board-game cards or safe sewing materials if it is made around the contents it must hold.
Practical steps
Choose a real clutter problem and empty a clean, dry box. Measure the largest object to be stored, then sketch internal divisions with a ruler. Make dividers from scrap cardboard, keeping the edges smooth enough for ordinary use. Try reversible folds or simple tape before using permanent adhesives. Put the actual items inside and observe whether they are easy to reach. Keep the first design for a week, recording whether any area collapsed or was hard to clean.
Worked local example
A Punggol family reuses a shoe box for school stationery. The first narrow divider tips when notebooks are removed. A revised folded support is wider at the base, and the same notebooks can now be lifted without dislodging the partition. The family spent very little, but the significant result is a design that was tested against a real task over several days.
Diagnose and repair
If the box bends, the cause may be excessive load, moisture, an unsupported long panel or a joint in the wrong position. Do not strengthen everything indiscriminately. Locate the first deformed section, add support where it is actually needed and rerun the same test. If the original box is contaminated or already damaged, stop and use a different clean material instead of forcing a hazardous reuse.
Transfer the skill
An upcycled organiser teaches resourcefulness and the discipline of identifying a user need. The same thinking is useful in project management: better requirements can reduce waste more effectively than more material. Children can calculate divider spacing, label categories and write a concise instruction card. Adults can model a habit of evaluating old possessions before replacing them with a new purchase.
Safety and evidence boundary
Never reuse chemical packaging for food, make containers from unsafe or unhygienic materials or alter an electrical device as a casual family activity. Scissors and sharp tools require age-appropriate adult supervision. Avoid exaggerating environmental benefits as exact carbon savings without reliable lifecycle data. Use NEA’s accepted recycling guidance for items that cannot be reused safely.
Primary source: Upcycle a clean box into a useful home organiser. Verify live programme dates, eligibility and venue access.
7. Build and test a miniature Punggol Waterway bridge
Where: Public Punggol Waterway Park viewpoint for inspiration; small model tested safely at home.
Why this skill matters
NParks describes Waterway Park’s Jewel, Wave, Sunrise and Kelong bridges in its learning materials. These provide memorable visual forms for a model, but a child’s cardboard experiment is not an engineering assessment of the actual structures. The useful principle is that a span has to transfer a load through its supports. Changing the fold of an ordinary sheet can alter how the model behaves even when the amount of material stays similar.
Practical steps
From a safe public path, draw one outline and note what cannot be seen. At home, construct two supports the same distance apart and make a flat paper beam. Add a few identical small counters one at a time until the model bends, staying away from falling heavy objects. Rebuild using a folded or channel-shaped beam from the same paper type. Repeat the test carefully and record the load at which the first visible change occurs.
Worked local example
Two students compare a flat strip against a folded strip across the same desk gap. The flat one sags earlier while the folded version stays straighter under several counters. They can conclude only that the folded form performed better in their particular setup. They cannot infer the actual bridge’s safety margin, materials, foundations or design capacity from the desk test.
Diagnose and repair
If the comparison is inconsistent, inspect whether the supports shifted, the paper sizes differed or the counters were placed unevenly. Mark the point where bending begins. Repeat tests when possible instead of selecting only the trial that confirms the desired result. Use ordinary vocabulary—span, support, load and deflection—while explaining the limitations of a miniature model. A good test is fair before it is impressive.
Transfer the skill
The project creates a concrete link between practical making and Secondary school mathematics. Measurements, ratios, fair comparisons and diagram labels become necessary because the learner needs them for a real question. It also introduces evidence boundaries: a photograph shows shape, while the model tests one simplified physical relationship. Communicating that difference is a valuable habit for later STEM work.
Safety and evidence boundary
Never attach testing equipment to real bridges or hang objects from their railings. Public paths are shared; do not block cyclists, families or wheelchair users. Keep modelling loads tiny, avoid sharp cutting tools where possible and seek adult guidance. The project demonstrates one idea about paper-beam form, not public infrastructure safety.
Primary source: Build and test a miniature Punggol Waterway bridge. Verify live programme dates, eligibility and venue access.
8. Create a miniature exhibit about Old Punggol Road
Where: NLB Punggol Stories materials and the publicly opened Punggol Heritage Trail segment.
Why this skill matters
Local history makes an excellent making prompt when the maker is careful about sources. JTC and NParks describe an opened initial stretch of Punggol Heritage Trail and the retention of older landscape features. A miniature paper exhibit can show what has changed while preserving the difference between an archival fact and an artistic reconstruction. Unlike a generic model village, a well-labelled display allows a reader to trace a claim back to official information.
Practical steps
Choose one verified historical feature, such as the role of Old Punggol Road in the landscape. Read an official account and record its date. Prepare a three-panel card: documented past, observed present and clearly imagined reconstruction. Draw the images yourself or use materials you have permission to reproduce. Mount them on folded cardboard supports. Add source labels and an explanation of what you do not know. Let another reader review the display for accidental claims of certainty.
Worked local example
A student builds a small paper representation of a path, one tree and a label about the heritage trail. Their first version calls it the full completed route. After checking JTC, they amend the caption to describe the publicly opened initial section and label the longer alignment as planned. The correction is more important than the craftsmanship because it makes the display trustworthy.
Diagnose and repair
Ask whether a viewer can distinguish a dated source from a present-day photograph and a fictional model. If the difference is unclear, add better captions rather than more decoration. Check place names and opening phases one by one. If an archival image has unclear rights, replace it with a credited summary and an original drawing. Make accuracy part of the final assessment, not an afterthought.
Transfer the skill
This activity connects craft with research, English explanation and civic awareness. The maker has to decide what the audience needs first, how to sequence information and how to avoid overstating evidence. A compact exhibit can be a prototype for a longer school presentation or oral-history interview plan, but should not invent witnesses or claim an imaginary scene is documentary truth.
Safety and evidence boundary
Do not collect heritage objects, remove public plants, enter fenced works or photograph identifiable visitors intrusively. Current JTC access notices govern the trail, and archival materials may have reuse restrictions. A physical model is educational interpretation and must be presented as such, not as a precise reconstruction of historical structures.
Primary source: Create a miniature exhibit about Old Punggol Road. Verify live programme dates, eligibility and venue access.
9. Prototype shade using Punggol Digital District design as inspiration
Where: Public open areas near Punggol Coast MRT and a safe desk-based demonstration at home.
Why this skill matters
JTC describes sustainability systems at Punggol Digital District, including passive shading and ventilation. Visitors can observe some exterior design features from permitted public areas, but should not confuse those observations with measurements of energy savings. A cardboard facade and simple movable awning make the idea of shading easier to understand. The question is how geometry changes where light falls under controlled conditions, not whether a model proves the performance of the real development.
Practical steps
Sketch a simple public facade or awning seen from a lawful position. At home, fold a small cardboard wall with a window drawn on it. Use a cool, safe battery-powered light set at a fixed distance and angle. Make two small paper awnings with different depths, place them at the same height and mark the boundary of the shadow on the model wall. Compare the results. Keep the room and light position unchanged as much as possible.
Worked local example
A family notices that its first awning shades only a narrow band of the cardboard window. The second projects further and changes the shadow boundary under the same light angle. The family records the result with a ruler. They can state that awning depth changed the shadow in their desk model, while real building performance also depends on sun angle, weather, ventilation and energy systems.
Diagnose and repair
When a shadow appears inconsistent, check whether the light has moved or the cardboard facade has tilted. Repeat the trial with a fixed reference mark and a simple measurement. Do not modify the brightness, awning size and lamp angle together, because the effect becomes difficult to attribute. Write a question that a building professional would need to answer using real environmental measurements.
Transfer the skill
The experiment links design with angles, proportional reasoning and energy literacy. A student can compare their observation with JTC’s official sustainability description without inventing technical claims. It also encourages a useful planning question: how can a walkway provide shade while remaining navigable, open and safe? Modelling a small problem can improve understanding even when no equipment is purchased.
Safety and evidence boundary
Do not climb roofs or enter plant rooms, offices or active construction zones. Use a cool lamp rather than a hot light source, keep electrical equipment age-appropriate and avoid DIY mains wiring. JTC’s published projected benefits should be labelled as official expectations, not results measured by the family at home.
Primary source: Prototype shade using Punggol Digital District design as inspiration. Verify live programme dates, eligibility and venue access.
10. Publish a mini-zine explaining your prototype, failure and repair
Where: A home desk in Punggol or an appropriate independent writing space using your own materials.
Why this skill matters
A maker’s work has value when someone else can understand how a problem was solved. A small folded zine can show the design question, the first attempt, evidence of failure and the corrected version without expensive software. It also teaches honest communication: a successful display should not omit the failed trial that made the final design possible. The zine is a companion to a making project, not a claim that NLB or JTC has endorsed it.
Practical steps
Fold an ordinary clean sheet into a simple booklet and reserve sections for Problem, First Design, Test, Error, Change and Result. Write a concise caption on each page. Use original sketches or personal project photographs that do not reveal private details. Include a date and links to any official Punggol facts used for setting or inspiration. Ask one reader who has not seen the project to explain what improved. If they cannot identify the correction, revise the captions.
Worked local example
A child describes a cardboard stationery organiser. The first design tips when notebooks are removed, so the next uses folded side supports. The zine shows the same notebooks in both tests and explains why the second arrangement remained upright. The reader can follow the reasoning without needing to be told the object is brilliant. The improved explanation becomes part of the maker’s real achievement.
Diagnose and repair
When a zine looks attractive but feels confusing, check whether it starts with a clear problem and gives an actual reason for the change. Do not replace specific observations with vague praise. If the maker cannot explain why the second version behaved differently, label the cause uncertain and propose a more controlled test. A transparent limitation can make the write-up stronger than an exaggerated success story.
Transfer the skill
Documenting a project strengthens structured English, diagram reading and critical reflection. It helps students move from showing a product to defending a decision. Adults can use the same habit in professional portfolios, where clients often need to understand scope, evidence and reliability rather than a gallery of polished results. A short honest maker record can be reused when starting the next project.
Safety and evidence boundary
Do not reproduce whole copyrighted designs or imply affiliation with a library, school or government agency without permission. Remove identifiers, faces and precise home details before public sharing. An online portfolio should be age-appropriate and controlled by the person responsible for the material.
Primary source: Publish a mini-zine explaining your prototype, failure and repair. Verify live programme dates, eligibility and venue access.
How to choose between a Starter Session and MakeIT Yourself
NLB describes three distinct pathways: guided Starter Sessions, makerspace equipment use that may require relevant certification, and MakeIT Yourself self-service equipment bookings. Their conditions cannot be merged into one promise that anybody may use any machine. Check whether you are beginning the technology, whether your desired Punggol machine is on the self-service list, and whether the specific session requires Singpass verification, certification or booking. Start with the simplest approved pathway that teaches the skill you actually need.
If a session is full, do not improvise access through someone else’s booking. Prepare your sketch, file or cardboard test and wait for a suitable date. Similarly, an activity advertised nationally under MakeIT may be located in another library, not necessarily Punggol. Check the named venue on the exact programme listing. A local outing should not depend on an invented capacity or a time slot that the operator has not confirmed.
A reusable test record for every project
- Problem: write one sentence stating the real need, user and expected function.
- Prediction: state what you expect the first version to do and why.
- Materials: list only materials actually used and tools operated with appropriate permission.
- Test: hold relevant conditions steady and record a direct observation rather than an opinion.
- First wrong step: identify the earliest point where the design or instructions diverged from what was required.
- Change: revise one major variable and record what changed.
- Retest: compare against the same goal and state the remaining uncertainty.
- Hand-off: write a short caption or zine that another person can understand.
Three maker-day plans in Punggol
A ninety-minute cardboard project
Spend fifteen minutes choosing a modest home problem, ten minutes measuring, thirty minutes making a first object, fifteen minutes testing, fifteen minutes revising and five minutes writing what you learned. A compact stationery organiser, letter display or foldable greeting card is suitable. A project that fails at its first test is not an excuse to use unsafe shortcuts. Record the failure and decide whether the next iteration deserves another day.
A booked library maker-session visit
Confirm the exact NLB session, machine or self-service slot and arrive with a manageable design. The purpose is to learn the tool’s limits and follow instructions correctly. Allow time for check-in, setup, cleanup and safe handling. If a device is unavailable, retain the prepared design for later rather than assuming alternative equipment has the same safety requirements. Finish by writing three observations about what the machine did and what you would change in the file.
A bridge-and-design inspiration outing
Visit one lawful public waterway viewpoint in appropriate weather, then return home to build a small paper model. Photograph or sketch from a position that does not obstruct others. Discuss visible support forms, but do not assign an engineering strength to a real bridge. Test one desk model with small equal loads, record the result and distinguish the simplified classroom finding from real infrastructure.
The difference between a demonstration and a trustworthy claim
An attractive prototype photograph shows appearance. It does not necessarily show reliability, lifetime, performance under all conditions or safety for everyday use. If a desk model blocks light, that does not measure energy reduction in Punggol Digital District. If a sheet of paper carries counters, it does not certify a public bridge. Use language such as ‘in this test’ and ‘under the measured conditions’ to make results accurate. Cite NParks, JTC or NLB where their published facts support the background.
This distinction is especially important for younger learners who want to tell an exciting story about their creation. Encouragement and accuracy can coexist: celebrate effort, but ask which measured improvement justifies the conclusion. If no data exists, write what was observed and identify the next sensible test. Teachers and parents can use the same habit in project work without turning every family outing into an examination.
Frequently asked questions
Is MakeIT available at Punggol Regional Library?
Yes. NLB lists MakeIT at Punggol Regional Library on Level 4 of One Punggol.
Can beginners try 3D printing?
NLB offers beginner learning and equipment options, but the exact route depends on programme eligibility, certification and bookings.
Does Punggol Library have 3D pens?
NLB’s MakeIT Yourself reservation list includes 3D pens at Punggol Library.
Can I use a sewing machine there?
NLB lists sewing machines for Punggol MakeIT Yourself booking; follow current age, safety and booking requirements.
Do I need Singpass to reserve equipment?
NLB’s booking page says it introduced Singpass verification for machine reservations.
Does a library card mean I can use all machines?
No. Relevant starter training, safety conditions and equipment-specific certification may apply.
Can a child use a hot 3D pen independently?
Do not assume so. Follow the current venue’s age and adult-supervision policies, and protect against hot nozzles and material.
Are robotics lessons always running?
No. Robotics and coding are MakeIT learning areas, but a particular session’s availability must be checked.
Are materials always free?
Do not assume that. Ask about any programme, consumables or equipment conditions before making plans.
Can I borrow a 3D printer to take home?
A MakeIT booking is for the service’s approved equipment use; take-home borrowing is not established by the published machine listing.
What is the easiest maker project?
A clean cardboard organiser or small paper structural model, with a defined purpose and safe materials.
How do I compare two paper bridges fairly?
Keep the span, paper and small loads as similar as possible and change one fold or design feature at a time.
Can I test an actual Punggol bridge?
Do not attach or hang experimental loads on public infrastructure. Use only a separate desk model.
Can I collect park plants for models?
Do not remove living plants or heritage specimens. Draw or photograph lawfully from public paths.
Can I use photos of old Punggol in my exhibit?
Check archive rights and reproduction conditions before publishing, and label artistic reconstruction separately from facts.
Is the full Punggol Heritage Trail open?
JTC’s referenced information identifies an opened first section. Verify later openings and obey present access signs.
What if my first design fails?
Record the point of failure, identify a plausible cause, revise one variable and retest rather than hiding the result.
Should I buy a printer immediately?
Try safe simple prototypes and the relevant public learning opportunities before investing in equipment.
Is an upcycled plastic container always food-safe?
No. Use containers only for suitable purposes and never reuse hazardous chemical packaging for food.
Can I repair a safety harness on a sewing machine?
Do not make casual safety-critical repairs. Use manufacturer-approved methods or qualified services.
Is a model awning proof of lower energy use?
No. It can demonstrate changing shadows under a controlled desk light, not actual building energy performance.
Can I publish the design on social media?
Use original images, avoid sharing children’s private information and respect copyright and venue rules.
How can I show improvement in a portfolio?
Show the problem, first version, test, specific error and revised outcome with labelled evidence.
Which article helps with more Punggol creative options?
See the related Punggol creative activities guide for a broader directory; this page focuses specifically on making, testing and repair.
Official sources and related Punggol reading
- NLB MakeIT learning and safety information
- NLB Punggol MakeIT Yourself equipment bookings
- NParks Punggol Waterway Park features
- JTC Punggol Digital District sustainability design
- JTC community and heritage trail
- NEA reduce and reuse guidance
- Punggol creative activities directory
- Punggol mini-zine making guide
- Urban planning fieldwork guide
Build something you understand
The best maker activity in Punggol is the one that leaves you able to explain what you built, why the first attempt behaved as it did and how you would improve it. Start with the smallest safe test, use public equipment only with permission, and document the limits of your conclusion. That practical clarity makes a simple object worth making.


