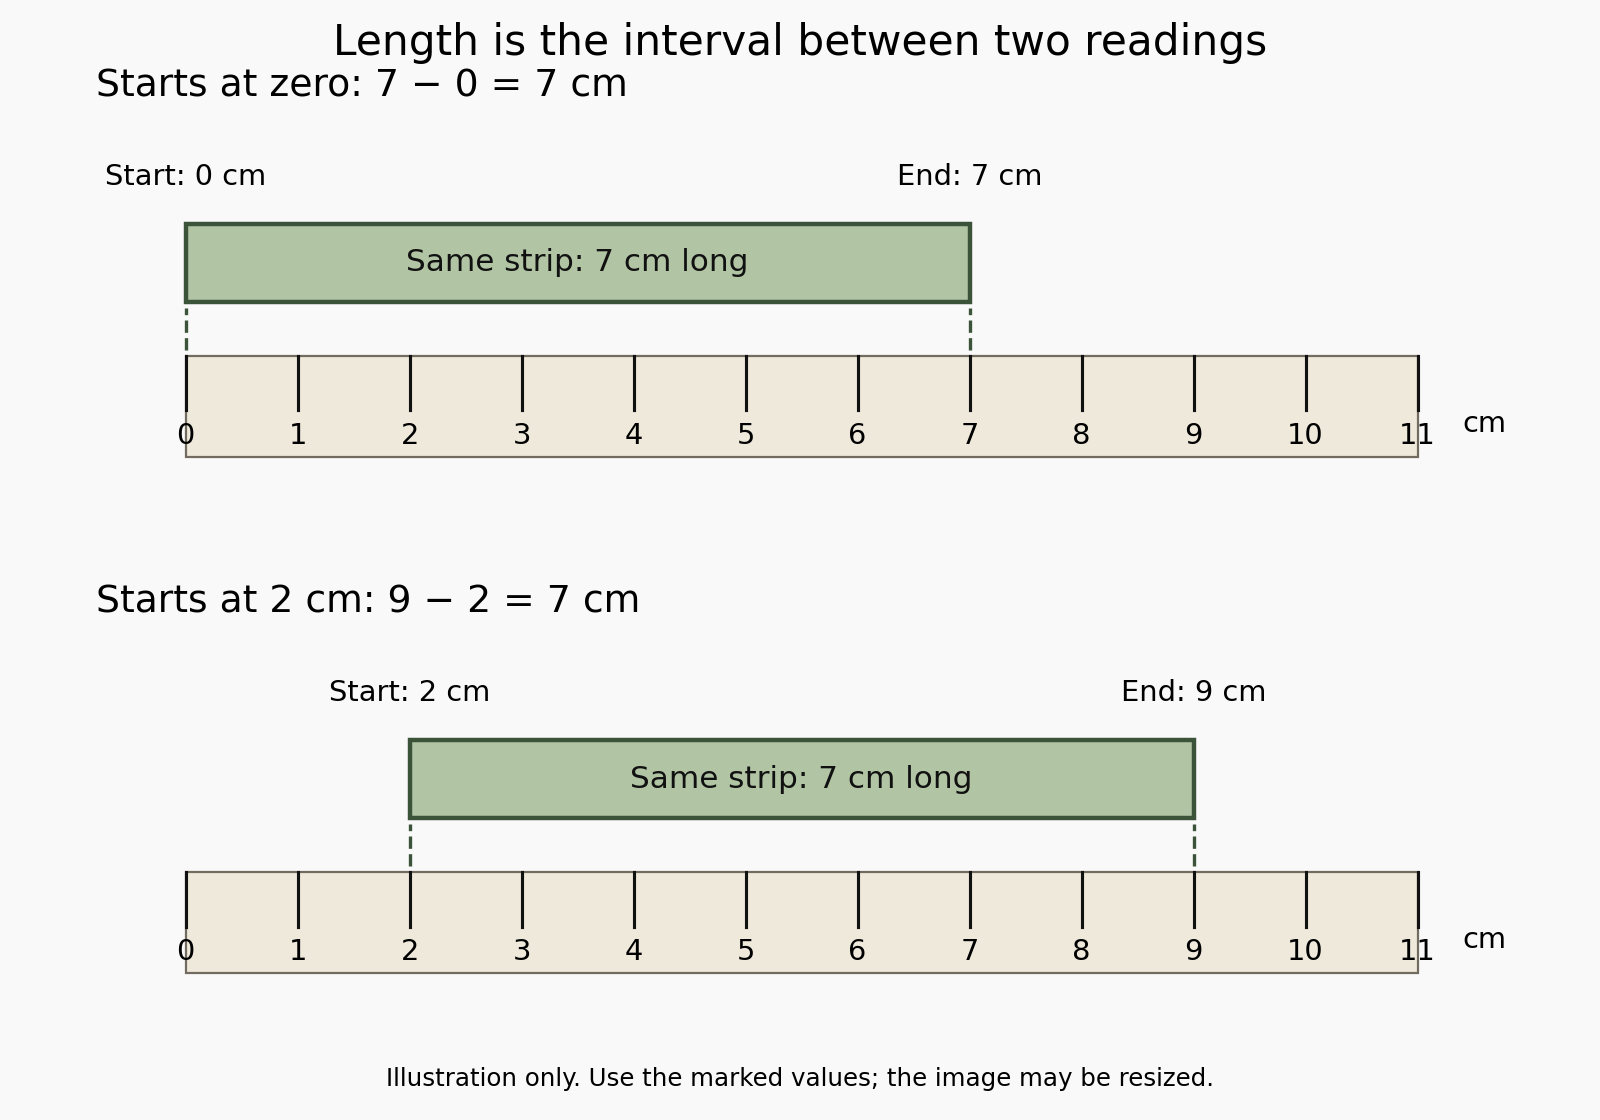
Your Primary 3 child sees a pencil starting at the 2 cm mark and ending at the 9 cm mark, then writes “9 cm long.” If you are considering Primary 3 Mathematics tuition in Punggol, the immediate repair is to distinguish an endpoint from a length. Nine centimetres is the reading at the pencil’s far end. The pencil itself spans 9 − 2 = 7 cm.
A Punggol Maths tutor can make this visible by measuring the same seven-centimetre strip twice: first from 0 to 7, then from 2 to 9. The strip does not become longer when it moves along the ruler. Its endpoint reading changes, but the distance between its two ends stays seven centimetres.
Useful Primary 3 Mathematics tutorials should connect subtraction to the measured interval, rather than simply teach “subtract the first number” as another rule to memorise. This guide helps parents use a ruler carefully, identify whether the difficulty involves alignment, scale reading or the start point, and bring a precise learning question to Primary 3 Mathematics tuition in Punggol.
eduKate Punggol · Primary Mathematics · Parent questions
Find your next learning step
Start with the question closest to your family, or read the full guide in order.
Chapter index
Identify the span · Chapters 1–3
See the two placements · Chapters 4–7
Find missing quantities · Chapters 8–11
Read valid measurements · Chapters 12–15
Review and continue · Chapters 16–23
- An original practice set with worked answers
- A short home activity using one paper strip
- What should a Primary 3 Maths tutor assess?
- Look for progress in what the child measures first
- Parents’ questions about rulers, diagrams and subtraction
- A calm conversation when the endpoint answer is wrong
- What can four different answers to one ruler question reveal?
- Where should your family go next?
CHAPTER 1 OF 23 · Identify the span
1. What should your child point to before giving a length?
Ask the child to point to both ends of the object. Then ask which ruler mark lines up with each end. For a strip from 2 cm to 9 cm, the starting reading is two and the ending reading is nine. The length is the distance between those readings. Establishing both endpoints prevents the far-end number from becoming the automatic answer.
Keep the first example straight and easy to see. Use a paper strip with square ends, place it parallel to the scale and choose whole-centimetre marks. A tapered pencil can make the exact endpoint harder to identify. There will be time for realistic objects later; the first demonstration should isolate the start-point issue.
You can say, “The ruler tells us where each end is. We need how far apart the ends are.” That language distinguishes position from distance without introducing formal vocabulary that the child cannot yet use. Ask them to trace the part of the ruler covered by the strip. The traced interval is the quantity the question asks for.
If the child gives nine again, point to the uncovered part from zero to two. Ask whether that part belongs to the strip. It does not. Nine counts the distance from the ruler’s zero to the far end, including those two uncovered centimetres. Removing that extra part leaves the strip’s seven-centimetre length. The subtraction now has a visible purpose.
CHAPTER 2 OF 23 · Identify the span
2. Why reading the end number often appears to work
Many early measurement examples place an object at the zero mark. When the start reading is zero, the endpoint reading and the length have the same numerical value. A strip from zero to seven is seven centimetres long. The child can repeatedly obtain correct answers by looking only at the far end.
That habit becomes visible when the start point changes. A strip from two to nine still spans seven centimetres, but the endpoint is nine. The old shortcut now includes a section of the ruler outside the object. The child may be accurately reading the numeral nine while answering the wrong quantity.
This distinction is useful for parents. The child’s answer does not necessarily show that they cannot read a ruler. They may have missed the requirement to identify the beginning of the interval. A tutor can test the two skills separately: read an indicated mark, then measure an object whose start is not zero. Different results reveal the missing connection.
Avoid telling the child that the endpoint is always wrong. It is a valid reading, and it equals the length when the object begins at zero. The dependable method is to notice both ends. Starting at zero is a practical convenience that simplifies the calculation; it is not the reason a ruler can measure length.
CHAPTER 3 OF 23 · Identify the span
3. The centimetre is the interval, not the printed numeral
On a centimetre scale, the distance between neighbouring centimetre marks is one centimetre. The numeral labels a position measured from zero. A child who counts printed numbers instead of spaces may count too many units. From the mark 2 to the mark 9 there are seven one-centimetre intervals, even though eight whole-number labels are encountered if both endpoints are counted.
Trace those intervals slowly: two to three, three to four, four to five, five to six, six to seven, seven to eight and eight to nine. Count each travelled space once. The result is seven centimetres. The start mark itself is not a centimetre of length; it marks where the first interval begins.
Use a row of equal paper tiles if this distinction remains difficult. Seven tiles laid edge to edge occupy seven units of length. They have eight boundary lines when the two outside edges are included. The ruler marks are like those boundaries. We measure the spaces they delimit rather than count every line as a separate unit.
Then return to the ruler and repeat one short interval, such as 4 cm to 6 cm. It spans two centimetres: four to five and five to six. A child who answers three may be counting the labels four, five and six. This small example makes that error easier to discuss than a crowded ruler with many tick marks.
CHAPTER 4 OF 23 · See the two placements
4. A complete worked example from 2 cm to 9 cm
Imagine a straight strip aligned with the centimetre scale. Its left end is at the 2 cm mark and its right end is at the 9 cm mark. Read both positions aloud: start two centimetres, end nine centimetres. The question asks for the strip’s length, which is the interval between those positions.
One method is to count the centimetre spaces from two to nine. There are seven. A second method uses subtraction: 9 cm − 2 cm = 7 cm. Both methods describe the same measured interval. The subtraction removes the two centimetres before the strip begins from the nine centimetres measured from zero to its far end.
Check by moving a copy of the strip so that its starting end sits at zero. Its far end should now align with seven. The physical strip is unchanged, so the two measurements should agree. This check connects the arithmetic to the object, rather than relying only on repeating nine minus two.
The answer is “The strip is 7 cm long.” Nine centimetres remains the ending reading in the original placement. Two centimetres remains the starting reading. Seven centimetres is the length. Write those labels beside the demonstration if your child keeps mixing them. All three numbers are meaningful, but only one answers the length question.
CHAPTER 5 OF 23 · See the two placements
5. See the same length in two ruler positions
The teaching diagram below shows a seven-centimetre strip in two positions on a centimetre ruler. In the first position it begins at zero and ends at seven. In the second it begins at two and ends at nine. The coloured span has the same length in both panels. Only its location along the ruler has changed.

Read each panel by identifying both ends. In the first, 7 − 0 = 7. In the second, 9 − 2 = 7. The second endpoint is larger because the whole strip has moved two centimetres along the scale. That movement has not stretched the strip or created extra centimetres within it.
Ask your child to explain what stayed the same. Suitable answers include “the strip,” “the number of centimetre spaces it covers” and “the length.” Ask what changed. The start and end readings changed. This is a useful first-principles check: a method for measuring length should not report a new length merely because the unchanged object moved along the ruler.
The diagram is a teaching illustration, not a substitute for a real measuring instrument. Screen size and printing settings can resize it. Read its marked scale to understand the relationship; do not place a household ruler against the screen and expect the illustrated centimetre spacing to match physical centimetres.
CHAPTER 6 OF 23 · See the two placements
6. The plastic edge may not be the zero mark
Many rulers have a small margin before the zero line. If a child aligns the object with the physical end of the ruler instead of the zero mark, the endpoint reading does not directly give the length. The exact size of the margin depends on the ruler. Do not invent a standard correction for every plastic edge.
Show the child the printed zero mark on the ruler being used. Explain that this is the starting reference for an ordinary zero-based measurement. The ruler’s outer edge is a piece of plastic; the marked scale defines the measurement. A chipped or unusually shaped edge makes this distinction especially visible.
Practise aligning one end of a paper strip with the zero line. The alignment should be across the scale, not merely close to the numeral zero. The printed numeral may sit beside the actual tick. Point to the line that represents the position and place the strip’s end directly above it.
If the ruler is damaged at zero but another section of the scale is intact, a non-zero starting mark can still support measurement. Record the start and end readings, then find their difference. This works when the relevant scale is clear and accurate. A ruler with distorted spacing or unreadable marks should be replaced rather than treated as a puzzle the child must solve.
CHAPTER 7 OF 23 · See the two placements
7. Choose a clear scale before introducing smaller units
For the first start-point lesson, use whole-centimetre marks. The child needs to distinguish an endpoint from a span. Dense millimetre ticks add another reading task that can obscure that distinction. Once the start-and-end relationship is understood, the same idea can be applied to finer scales when those are part of the child’s current learning.
Ask which unit the ruler labels show. A dual-scale ruler may have centimetres on one edge and inches on the other. Use one scale consistently for both endpoints. Subtracting a starting number from one scale and an ending number from another does not measure a meaningful interval in either unit.
If the child is learning millimetres, state the conversion clearly: one centimetre is ten millimetres. The distance from 2 cm to 9 cm is seven centimetres, or seventy millimetres. These are two ways to express the same length. The larger numerical value in millimetres does not mean the strip physically became longer.
Keep advanced notation optional in this guide. A start-point misconception can be repaired with whole-centimetre positions and ordinary subtraction. Parents should follow the unit range and reading precision being taught at school rather than make decimals, compound units and unfamiliar conversions a prerequisite for understanding why an object from two to nine is seven centimetres long.
CHAPTER 8 OF 23 · Find missing quantities
8. Why the final reading must be taken from the correct end
Place the ruler beside the strip so that the scale runs parallel to it. The endpoint reading should correspond to the strip’s actual end, projected directly to the scale. If the ruler is angled across the object, or the child reads where a sloping edge appears to cross a different part of the ruler, the resulting number may not represent the intended straight length.
For a rectangular strip, measure along its long edge. Identify the beginning and end of that edge clearly. Do not let the child measure from a corner on one side to a different corner on the opposite side unless the question specifically asks for that diagonal. The object’s orientation and the requested dimension matter.
View the scale from above when possible. Looking at a thick ruler from an angle can make an endpoint appear aligned with a neighbouring mark. This is a practical measurement issue rather than the mathematical start-point misconception, but both can occur in one activity. A plain strip, a flat surface and a clear viewing angle reduce unnecessary ambiguity.
After a physical measurement, ask the child to show the interval again. If they subtract correctly but used the wrong endpoint, the arithmetic will still produce an incorrect length. Good measurement begins with identifying the quantity and locating its boundaries. Calculation comes after those readings have been taken from the intended part of the object.
CHAPTER 9 OF 23 · Find missing quantities
9. Move the strip and predict what will happen
Begin with a strip from 0 cm to 7 cm. Ask how long it is. Then say, “I will move the whole strip so that it begins at 3 cm. Where should its far end be?” Because the length remains seven centimetres, the new ending reading is 3 + 7 = 10 cm. Let the child predict before moving it.
Move the strip without stretching or rotating it. Check that it spans from three to ten. Ask whether it has become ten centimetres long. The physical comparison shows that it has not. The endpoint reading increased, but the interval stayed seven. This activity makes the error in using the end number as the length visible through an unchanged object.
Now move it so that it begins at one. The end should be eight. The three placements, zero to seven, three to ten and one to eight, all represent seven-centimetre spans. You can record the start, end and length in three labelled columns on paper. The labels matter more than a polished table.
This prediction task also connects subtraction and addition. To find the length from two endpoint readings, subtract. To find the ending reading from a known start and length, add. The operations are not arbitrary worksheet rules; they answer different questions about the same interval. That relationship becomes useful when your child later meets missing-endpoint problems.
CHAPTER 10 OF 23 · Find missing quantities
10. A missing ending reading uses the same interval idea
Try this original example: “A strip is 6 cm long. One end is at the 4 cm mark. Where is the other end, further along the ruler?” The start is four and the length is six. Move six one-centimetre spaces forward from four. The ending reading is ten centimetres. The calculation is 4 + 6 = 10.
Make the direction explicit. The phrase further along the ruler tells us the second end has a larger reading. Without an indicated direction or diagram, a distance from a point can extend in either direction if the scale allows it. Early practice should give the intended placement clearly rather than make the child guess an unstated orientation.
Check the result by subtracting the start from the end: 10 − 4 = 6. That recovers the given length. The check confirms that the endpoint and length fit together. A child who answers six for the ending reading has named the length instead of the position, which is the reverse of the original endpoint-as-length error.
Do not introduce this variation before the basic measurement is understandable. Its purpose is to deepen the same relationship once the child is ready. The child can use counters for ruler spaces or a simple labelled sketch. They do not need an algebraic equation to reason that a six-centimetre strip beginning at four will end at ten.
CHAPTER 11 OF 23 · Find missing quantities
11. A missing starting reading can be worked backwards
Here is another original example: “A strip is 5 cm long. Its far end is at the 12 cm mark. What is the starting reading?” The start is five centimetres before twelve, so it is seven. The calculation is 12 − 5 = 7. The strip spans the interval from 7 cm to 12 cm.
Show this physically by placing a five-centimetre strip with its far end at twelve. Its other end should sit at seven. Then verify the measured length: 12 − 7 = 5. The two subtraction statements find different unknowns, so attach a label to each answer. Seven is a position; five is the strip’s length.
Some children memorise “end minus start” and become unsure when the start itself is missing. Return to the covered interval. The strip takes up five centimetres ending at twelve, so its beginning must be five centimetres earlier. The visible model makes the backwards step interpretable without asking the child to rearrange a symbolic formula.
Use manageable numbers and keep the ruler’s direction familiar. A start-point repair should not turn into an unnecessarily difficult arithmetic task. Once the child can distinguish the three quantities, larger numbers can be introduced if appropriate. The important gain is that they know which number describes a boundary and which number describes the span between boundaries.
CHAPTER 12 OF 23 · Read valid measurements
12. Counting spaces helps explain the subtraction
When a child asks why the start reading is subtracted, let them count the spaces in a short example. From 3 cm to 8 cm, the spaces are three to four, four to five, five to six, six to seven and seven to eight. There are five. The numerical difference 8 − 3 is also five.
Point out the spaces before the object begins: zero to one, one to two and two to three. The endpoint reading eight includes those first three spaces when measured from zero. They do not belong to the object. Subtracting three removes them and leaves the five spaces actually covered by the strip.
This explanation connects two legitimate approaches: counting units and finding a difference. Counting may be efficient for a short visible span. Subtraction becomes useful when the interval is longer or the scale labels skip values. We are not replacing a meaningful counting method with an unexplained calculation; we are showing why the calculation measures the same thing.
If the child counts marks instead of spaces, begin with a strip from one to two. It has two boundary marks but spans one centimetre. Then extend to one to three: three boundary labels, two centimetre spaces. These small contrasts isolate the extra-one error. Once the child notices the distinction, return to the original seven-centimetre example.
CHAPTER 13 OF 23 · Read valid measurements
13. What if the ruler labels do not show every centimetre?
A diagram may label only 0, 2, 4, 6 and so on while retaining intermediate tick marks. The difference between neighbouring labelled values is two centimetres. The child needs to inspect the scale before counting spaces. A drawn gap between two labels is not automatically one centimetre.
For example, suppose a scale has labelled marks at 0, 2, 4, 6, 8 and 10 cm, with one equally spaced intermediate mark between each pair. Each small interval is one centimetre. A strip from 2 to 8 spans six centimetres, even though the labelled positions encountered are only two, four, six and eight.
If there are no intermediate ticks and each adjacent labelled interval represents two centimetres, count each of those intervals as two. From two to eight there are three labelled intervals, each two centimetres long, giving six centimetres. Subtracting the endpoint readings, 8 − 2 = 6, arrives at the same result when both use the same scale and unit.
Check that the diagram is intended as a uniformly spaced measuring scale. A decorative picture with irregular spacing should not be used as a real ruler. In a mathematical diagram, supplied numbers and stated conditions guide the calculation; visual size alone may be unreliable. The child should learn to read the marked scale rather than estimate a numerical length from how large the picture looks on the page.
CHAPTER 14 OF 23 · Read valid measurements
14. A broken ruler is a useful model, not a requirement to use damaged tools
The phrase broken-ruler question often describes an object measured from a non-zero starting mark because the zero section is missing. The mathematical idea is the same as our intact-ruler demonstration: the distance between two readable positions is their difference. It does not depend on the object beginning at zero.
Use an intact ruler to teach the idea first. Place the strip at two rather than zero. The child can see the original reference and the uncovered initial section. Later, cover the zero end with paper to create a non-zero-start illustration. This is easier and safer than breaking a ruler to manufacture a teaching object.
If the relevant centimetre marks remain accurate and readable, a non-zero span can be measured from them. If the ruler is bent, the printed scale is distorted or the object cannot be aligned clearly, choose another tool. The mathematical technique does not guarantee that every damaged physical instrument will produce a reliable measurement.
Parents do not need to make broken rulers the whole topic. The transferable idea is that a length is an interval, not a final coordinate. Moving a strip along an ordinary ruler demonstrates that idea just as well. A tutor can use the unusual starting position as a contrast after the child understands normal zero-based measurement.
CHAPTER 15 OF 23 · Read valid measurements
15. Separate ruler reading from unit conversion
A child can read the start and end correctly but convert the final length incorrectly. Another can convert seven centimetres to seventy millimetres accurately while still claiming the strip from two to nine is nine centimetres long. These are different errors. A useful lesson should identify which one occurred.
Begin by keeping both readings in centimetres. Find the length in centimetres: 9 − 2 = 7. Convert afterwards only if the question asks for another unit and that conversion is part of the child’s learning. This sequence keeps the measurement relationship visible before introducing a second numerical transformation.
If two endpoint readings are supplied in different units, they must be expressed in a common unit before subtraction. Such a question adds a conversion demand and is not necessary for the first start-point demonstration. Parents can save it for a later lesson rather than assume a child who struggles with it has forgotten the interval idea.
For broader unit work, see measurement: convert units before calculating. This article stays with the focused question of what the ruler’s start and end readings mean. Keeping those learning needs distinct helps a family choose the next practice instead of assigning every measurement worksheet in response to one wrong length.
CHAPTER 16 OF 23 · Review and continue
16. An original practice set with worked answers
Question A: a strip starts at 1 cm and ends at 8 cm. How long is it? The length is the ending reading minus the starting reading: 8 − 1 = 7. The strip is seven centimetres long. Eight is its endpoint position, not its length, because one centimetre before the strip is included in that position reading.
Question B: a strip starts at 4 cm and ends at 10 cm. How long is it? The length is 10 − 4 = 6 cm. Check by counting six one-centimetre spaces from four to ten. A child who counts seven may be counting both boundary labels as units.
Question C: a six-centimetre strip begins at the 3 cm mark and extends towards larger readings. Where does it end? The ending reading is 3 + 6 = 9 cm. Check that 9 − 3 = 6. The answer names a position on the scale, so do not write that the strip has become nine centimetres long.
Question D: a four-centimetre strip ends at the 11 cm mark. Where does it begin? The starting reading is 11 − 4 = 7 cm. Check that the interval from seven to eleven spans four centimetres. These four questions vary the missing quantity while keeping the same relationship between start, end and length.
CHAPTER 17 OF 23 · Review and continue
17. A short home activity using one paper strip
Cut or select a straight strip, measure its length carefully from zero and write the length on a separate note. Choose a whole-centimetre length that fits comfortably on the ruler. Then hide the note, move the strip to a non-zero start and ask your child to find its length.
For a seven-centimetre strip, try starts at zero, two and five. The corresponding endpoints are seven, nine and twelve. After each placement, ask the child to name the start, end and length. The same object supplies a controlled comparison because its size does not change between turns.
Let the child make one placement for the parent. Ask them to check the parent’s answer using both endpoints. If the parent intentionally calls the strip twelve centimetres long when it begins at five, the child can point to the uncovered five centimetres and explain the correction. Keep the deliberate mistake playful and finish with the correct measurement.
Record only what is useful: whether the child located zero, read both endpoints, counted intervals, chose the subtraction and included the unit. A short activity can reveal more than a page of final answers. It also gives the child a visible success: they can move the object and still measure its unchanged length accurately.
CHAPTER 18 OF 23 · Review and continue
18. What should a Primary 3 Maths tutor assess?
The tutor can begin with an ordinary zero-start measurement. Does the child align the object with the marked zero, choose the correct scale and read the endpoint? Then use a non-zero-start example. Does the child notice the new start and find the covered interval? The contrast identifies whether the problem is basic measurement technique or the meaning of the starting reference.
Next, ask the child to explain why the length stays the same when the strip moves. A child who says, “Both ends moved, but the strip did not grow,” has a useful conceptual starting point. A child who only repeats “subtract” may need the two placements demonstrated again.
Observe calculation separately. If the child sets up 12 − 5 correctly but makes an arithmetic error, the interval has been identified. If they calculate twelve plus five accurately, the operation selection is the issue. The tutor should report these differently because they call for different next activities.
When discussing Primary 3 Mathematics tuition at eduKate Punggol, bring an example showing the child’s original ruler reading and working. Ask how start, end and length will be distinguished and how the child’s independent reasoning will be checked. Confirm current arrangements directly. This learning guide does not establish a class timetable, fee, promised result or required number of lessons.
CHAPTER 19 OF 23 · Review and continue
19. Look for progress in what the child measures first
The first sign of progress may be that your child checks the beginning of the object before looking at the far end. This is a small behaviour with an important consequence. It means the start reading is now part of the measurement, rather than an unnoticed background detail.
A second sign is accurate language. “It ends at nine, but it is seven centimetres long” distinguishes two quantities clearly. The child may still need to calculate with support, but the interpretation is improving. Recognise that gain without pretending every part of measurement is already mastered.
A third sign is transfer to a fresh placement. Move a different strip from three to eight and ask for its length. The answer is five. If the child can explain the interval without the earlier seven-centimetre demonstration, the idea is becoming reusable. If they keep answering seven, they may remember the taught object rather than the method.
A fourth sign is a useful check. The child can add the length to the start and recover the end, or move the strip to zero and compare the result. Those checks test the measured relationship. Repeating the same subtraction may confirm arithmetic, but it does not reveal whether the child originally chose the correct endpoints and quantity.
CHAPTER 20 OF 23 · Review and continue
20. Parents’ questions about rulers, diagrams and subtraction
“Should my child always begin at zero?” For ordinary physical measuring, aligning with the zero mark is convenient and reduces calculation. The child should also understand how to measure a supplied non-zero-start diagram. Knowing the interval method makes the zero-start convenience meaningful rather than compulsory.
“Is end minus start always the answer?” It gives the length for ordered endpoint readings on the same straight scale and in the same unit. First establish the intended endpoints and which reading is greater. It does not fix a slanted placement, unreadable tick or mixed unit. A method needs valid readings to produce a valid result.
“What if the picture looks longer than the written numbers imply?” Use the stated scale and information in a mathematical question. A printed or digital illustration can be resized. If a task asks for physical measurement of a drawing, follow its instructions and use a correctly printed copy. Do not confuse measuring an actual picture with interpreting the marked readings in a supplied diagram.
“Does this mean my child is weak at subtraction?” Not necessarily. They may subtract accurately when asked directly but fail to identify the length as a difference. Test the calculation separately and observe whether the child recognises both endpoints. That evidence guides the next lesson more accurately than treating every wrong ruler answer as the same arithmetic problem.
CHAPTER 21 OF 23 · Review and continue
21. A calm conversation when the endpoint answer is wrong
Suppose your child writes nine centimetres for the strip from two to nine. Begin with what is accurate: “You read the end mark as nine. Now show me where the strip starts.” The child points to two. Ask whether the uncovered space from zero to two belongs to the strip. This question introduces the missing boundary without dismissing the correct scale reading.
Trace the strip’s covered interval together. Count the seven centimetre spaces or use the subtraction the child knows. Then write the three labels: start two, end nine, length seven. Ask the child to complete a sentence: “It ends at nine, but its length is…” The sentence makes the distinction explicit.
If your child feels embarrassed, use the moving-strip demonstration. The unchanged object cannot become longer simply because it moved. That observation lets the object and scale provide the correction. The parent does not need to repeat that the answer is wrong or describe the child as careless.
Praise the specific check: “You looked at both ends.” This is an action the child can repeat next time. If they are tired, stop after one successful correction and return to a fresh example later. A manageable experience of understanding is more useful than a long sequence of unsupported guesses about endpoint numbers.
CHAPTER 22 OF 23 · Review and continue
22. What can four different answers to one ruler question reveal?
Return to the strip from 2 cm to 9 cm. Four possible answers reveal different thinking. An answer of nine may show that the child read the far endpoint accurately but ignored the start. Ask them to identify the uncovered interval before the strip. The next teaching step is to connect length with both boundaries.
An answer of eleven may show that the child added the two readings. Ask what each number describes. Two is not a separate piece of the strip to add to nine; it is the position where the strip begins. Trace the covered interval and show how subtracting removes the initial uncovered section. Correct addition of the wrong quantities is different from an addition calculation error.
An answer of eight may show that the child counted the labels two through nine, including both endpoints. Ask them to count the spaces instead. Start with the interval from two to three: two printed labels bound one centimetre. Then return to the full strip. The likely repair is the distinction between marks and unit intervals, rather than a new explanation of subtraction facts.
An answer of seven is correct, but ask for one brief explanation before assuming the idea is secure. The child might count seven intervals, calculate nine minus two, or compare with the same strip beginning at zero. Those are meaningful methods. They might also have remembered that every strip in the previous activity was seven centimetres long. A fresh placement with a different-length strip distinguishes understanding from that memory.
These interpretations are possibilities, not automatic diagnoses. Listen to the child's explanation and observe a second example. The same written answer can arise through different routes. A tutor who preserves the original working and asks a small follow-up question can choose a much more precise lesson than one who groups every wrong response under careless measurement. Parents can bring these observations without needing to decide on the child's behalf exactly what went wrong.
If the child reads ruler marks accurately but ignores the start, continue with moving strips and labelled endpoints. If they count marks instead of intervals, use short one- and two-centimetre spans. If alignment or units are the difficulty, practise those separately with a clear ruler. Each observation points to a different next step.
For the wider level context, read Primary 3 Mathematics in Punggol. For a separate subtraction difficulty, see subtraction across zeros in Primary 3. That article concerns exchanging place-value units, while this one concerns selecting the interval to calculate. A family may need either or both, but they are not the same issue.
The MOE Primary Mathematics syllabus provides official curriculum context. Use current school work to decide the appropriate units and precision. This guide revisits a measurement foundation for a Primary 3 parent concern; it does not claim that non-zero-start ruler questions first appear at that level or predict a particular assessment.
A useful question for a Punggol Primary 3 Mathematics tutor is, “My child reads the far-end mark correctly but calls it the length even when the object starts at two.” That identifies the relationship to teach. Once both endpoints are visible, the subtraction becomes an understandable measurement of the space the object actually covers.